Kotlin
[Kotlin + Compose] 달력 구현(월 이동, 도트찍기, 모달)
mooni_
2025. 2. 13. 23:03
0. CustomCalendar
@Composable
fun CustomCalendar(onClick: () -> Unit) {
    val today = LocalDate.now()

    var visibleMonth by remember() { mutableStateOf(YearMonth.now()) }

    var selectedDate by remember { mutableStateOf<LocalDate?>(null) }

    Column(
        modifier = Modifier
            .fillMaxWidth()
            .padding(top = 30.dp),
        horizontalAlignment = Alignment.CenterHorizontally,
        verticalArrangement = Arrangement.spacedBy(20.dp)
    ) {
        CalendarHeader(visibleMonth,
            onPreviousClick = { visibleMonth = visibleMonth.minusMonths(1) },
            onNextClick = { visibleMonth = visibleMonth.plusMonths(1) })

        CalendarBody(visibleMonth, today, onDateClick = { clickedDate ->
            selectedDate = clickedDate
            onClick()
        })
    }
}
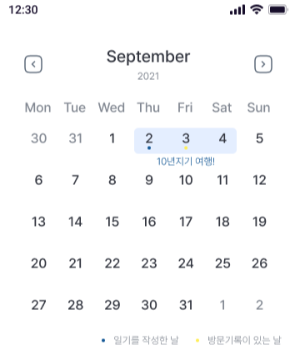
- CalendarHeader : 현재 연도와 월을 알려주고 이전 혹은 이후의 달로 이동 할 수 있음
- CalendarBody : 현재 월에 맞는 날짜를 보여주고 특정 날짜를 선택할 수 있음
1. CalendarHeader
@Composable
fun CalendarHeader(
    visibleMonth: YearMonth,
    onPreviousClick: () -> Unit,
    onNextClick: () -> Unit
) {
    Row(
        modifier = Modifier
            .fillMaxWidth()
            .padding(horizontal = 30.dp),
        horizontalArrangement = Arrangement.SpaceBetween,
        verticalAlignment = Alignment.CenterVertically
    ) {
        Icon(
            imageVector = ImageVector.vectorResource(R.drawable.previous_icon),
            contentDescription = "Previous",
            tint = IconGray,
            modifier = Modifier.clickable { onPreviousClick() }
        )
        Column(
            horizontalAlignment = Alignment.CenterHorizontally,
            verticalArrangement = Arrangement.spacedBy(5.dp)
        ) {
            //영어로 월 출력
            Text(
                text = visibleMonth.month.getDisplayName(TextStyle.FULL, Locale.ENGLISH),
                style = AppTypography.titleMedium,
                color = TextBlack
            )

            //연도 출력
            Text(
                text = "${visibleMonth.year}",
                style = AppTypography.labelMedium,
                color = TextDarkGray,
            )
        }
        Icon(
            imageVector = ImageVector.vectorResource(R.drawable.next_icon),
            contentDescription = "Next",
            tint = IconGray,
            modifier = Modifier.clickable { onNextClick() })
    }

    //Mon ~ Sun 글자 표시
    Row(
        modifier = Modifier
            .fillMaxWidth()
            .padding(horizontal = 30.dp),
        horizontalArrangement = Arrangement.SpaceBetween,
        verticalAlignment = Alignment.CenterVertically
    ) {
        Text(text = "Mon", color = TextDarkGray, style = AppTypography.bodyMedium)
        Text(text = "Tue", color = TextDarkGray, style = AppTypography.bodyMedium)
        Text(text = "Wed", color = TextDarkGray, style = AppTypography.bodyMedium)
        Text(text = "Thu", color = TextDarkGray, style = AppTypography.bodyMedium)
        Text(text = "Fri", color = TextDarkGray, style = AppTypography.bodyMedium)
        Text(text = "Sat", color = TextDarkGray, style = AppTypography.bodyMedium)
        Text(text = "Sun", color = TextDarkGray, style = AppTypography.bodyMedium)
    }
}- getDisplayName(TextStyle.FULL, Locale.ENGLISH) : 영어로 Month를 받을 수 있음, TextStyle을 조정해 짧게도 가능
- previous, next 아이콘에 월 이동 함수 설정
2. CalendarBody
@Composable
fun CalendarBody(
    visibleMonth: YearMonth,
    today: LocalDate,
    selectedDate: LocalDate?,
    onDateClick: (LocalDate) -> Unit
) {
    val firstDayOfMonth = visibleMonth.atDay(1) // 해당 월의 첫 번째 날
    val daysInMonth = visibleMonth.lengthOfMonth() // 해당 월의 총 날짜 개수
    val firstDayOfWeek = (firstDayOfMonth.dayOfWeek.value + 6) % 7 // 월요일(0) ~ 일요일(6)로 변환

    val totalCells = firstDayOfWeek + daysInMonth // 요일 포함한 전체 셀 개수
    val weeks = (totalCells + 6) / 7 // 총 주(week) 개수

    Column(
        modifier = Modifier
            .fillMaxWidth()
            .padding(horizontal = 30.dp)
    ) {
        // 주 단위로 Row 생성
        for (week in 0 until weeks) {
            Row(
                modifier = Modifier
                    .fillMaxWidth()
                    .height(30.dp),
                horizontalArrangement = Arrangement.SpaceBetween
            ) {
                for (day in 0..6) { // 7일씩 표시
                    val dayIndex = week * 7 + day - firstDayOfWeek + 1

                    if (dayIndex in 1..daysInMonth) {
                        val date = visibleMonth.atDay(dayIndex)
                        val isToday = date == today

                        Column(
                            modifier = Modifier
                                .size(35.dp, 30.dp)
                                .then(if (isToday) Modifier.background(BackgroundSky) else Modifier)
                                .clickable {
                                    onDateClick(date) // 날짜 선택
                                },
                            verticalArrangement = Arrangement.Top,
                            horizontalAlignment = Alignment.CenterHorizontally
                        ) {
                            Text(
                                text = dayIndex.toString(),
                                color = TextBlack,
                                style = AppTypography.bodyMedium
                            )

                            // 임시로 오늘을 기준으로 dot 찍음
                            if (isToday) {
                                EventDot(MainNavy)
                            }
                        }
                    } else {
                        // 빈 칸을 위한 Spacer (첫 주의 공백을 맞추기 위해)
                        Spacer(modifier = Modifier.size(35.dp, 30.dp))
                    }
                }
            }
        }
    }
}- visibleMonth에 따라 날짜를 보여줌
- 월요일부터 일요일을 하나의 행으로 정렬함
3. EventDot
@Composable
fun EventDot(color: Color) {
    Box(
        modifier = Modifier
            .size(4.dp)
            .clip(CircleShape)
            .background(color)
    )
}- 지정한 color의 Dot 생성
4. Screen